Monday, March 25, 2013

Thoughts on 3D Printing and Gaming Miniature Production.

From the first time I heard of 3D printing, rapid prototyping, or whatever you want to call it I have had a dubious wonder about it. The first time I heard it mentioned was in the early 1990s when rumor had it that Steve Jackson Games was considering using an early form of the process to create new OGRE miniatures. Since by this time I had become friends with Jeff Wilhelm, one of the best mechanical sculptors in the miniature business, I was unimpressed by this idea. How could anything sculpted in this new format match anything that I'd seen Jeff create from razor thin pieces of sheet styrene? It sounded like the eternally sought for Philosopher's Stone, a magical device that allows absolutely anyone to create whatever object is currently swimming around nebulously in their imagination without the requirement of time and practice. Like I said, I was dubious.

As the technology progressed however, I have had to reconsider my overall opinion about the process. It's obvious that some creators have embraced this new form of sculpting and are doing amazing work with it. Stunning, beautiful work. The problem that I see is not that such work is being created. It's that it seems effortless to those who don't understand the process.

When I first wanted to learn how to sculpt miniatures, I dreamed of working for Citadel Miniatures and cranking out space marines until my fingers fell off. I had all these great ideas! Ideas are important right? Sure! And then I mixed my first batch of green stuff and started prodding it and pushing it with a dental tool that I'd been given by miniature master Steve Lortz ( I think he said it was a +2 dental tool). Then suddenly my dreams of miniature sculpting fame fell away like the waxen wings of Icarus. Sculpting was bloody difficult! There was no quick way to build up a miniature and it seemed glacially slow compared to the speed of my fevered eighteen year old imagination. I kept at it on and off over the years but never really devoted the time to learning to sculpt that I needed to to become truly proficient.
Early sculpting. Although it's embarrassing to look back on these they remind me of how much better I've become through practice. 
If you can afford to have miniatures that you've sculpted cast you'll learn a ton about what works and what doesn't. There is a difference between the original model and the final castings that's important to see.
3D printing gets past a lot of this drudgery by seeming to be instantaneous. Of course it's not and sculpting a great piece in ZBrush can take just as long as sculpting a green from epoxy but perception is the thing here. And unfortunately in the expanding world of digital miniature sculpting perception, or a lack of it, can cause frustration and failure. In photography there is the term "parallax". This is the visual difference that exists between what the lens of the camera sees and what the eye of the photographer sees. In 3D printing there exists a form of parallax caused by the differences between what the 3D program renders and what is actually printed.

Take a look at the digital render of Crissy Hot-rod from my first attempt to create new Zombie Plague miniatures.
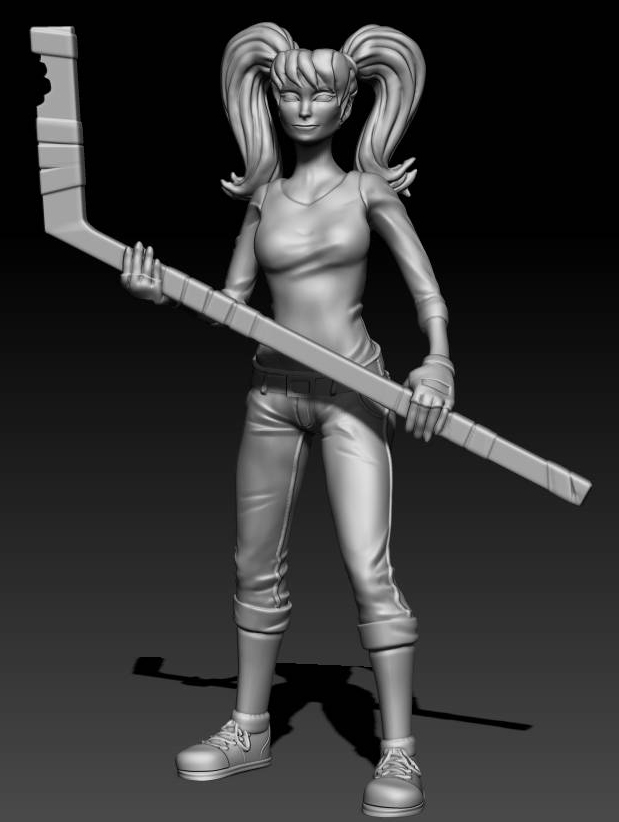
Even though the sculpting is not that great at least there seems to be a good amount of detail on the face. This is what it looks like once it was printed and cast in metal.
The detail pretty much disappears. And although the detail has been softened the strata caused by the printing process is still visible. The loss of detail is not because the casting process can't hold onto detail but it's because of the visual difference between what the rendering program shows and the reality of the actual digital information.

This is effectively explained by Jeff Rodman of Fortress Figures. Jeff has been working with 3D printed miniatures since they became a reality and has seen time and again the problems that can arise from digital parallax. 

"The problem is the traditional sculptor is sculpting in the scale the figure is in so he can adjust in real time so to speak.  The digital sculptor is sculpting much larger than the actual figure will be and has to imagine what it will look like at the ultimate size.  The renders are also a problem.  A render engine will add shadow to accent detail even if the detail is very shallow.  The renders are very deceptive and will not look like the ultimate castings.  

A lot of the problem is the natural inclination to use the default focal shift of the brushes.  Zbrush tries very hard to smooth your deformations into the current mesh.  Problem is, you don't want it smoothed in.  You want it to stand out.  This problem can be mitigated somewhat by using less focal shift on your brush or just making separate sub tools and sharpen the edges.  

This is the typical rivet added by a 3D sculptor:

It is smooth and the edges are blended into the larger mesh.  If it weren't all a shadow color, you could hardly see it. 
 
This is more like what you want if you want it to stand out:

This has hard edges but also notice it is taller and also notice the draft.  

If you need a round top, you still want to add sides:

These rivets will not just disappear in the prints.  

Here is an example of how most belts and bands are added by most 3D sculptors:
Notice the tapered edges just blend into the mesh.  

You want distinct hard defined edges for your objects more like this:
  

Try to leave no ambiguity as to where one object ends and another begins.  Remember that miniatures are by their very nature distorted caricatures of what they are depicting.  If you do them true to scale, heads, hands and weapons are very tiny and much of your detail is just too fine to see let alone cast."

So many of the problems that arise from digital to physical come from the rendering program's attempt to smooth the visual image of the render in a way that is actually detrimental to the final physical form. This problem must by compensated for by the digital sculptor if they hope to have miniatures that look anywhere close to their renders.

As this new form of miniature sculpting evolves it is necessary for beginning creators to understand that they are not using a magical device to create miniatures but are instead bound by even more circumstances that can determine if a project succeeds or fails. Basically before you launch a Kickstarter based on some cool 2D artwork that you want to have rendered in 3D and then printed and physically cast learn the process and know what you're up against. There seems to be an overly optimistic sense of what can be down digitally by people who are not yet aware of it's limitations. And all of the positive thinking in the world won't help you if you can't produce good looking miniatures in a reasonable amount of time. Stay inspired and creative but learn as much as you can before you start asking for other people's time and money.

For another take on some of these same issues check out The Eclectic Artists Resource Page by master eclecticist Kevin Contos:

Monday, February 18, 2013

Dreamforge Unboxing Part 3: Ada.

One of my favorite bits of the recent stuff I've gotten from DreamForge is Ada, Little Lady with a Big Gun. Kitted out in Eisenkern stormtrooper armor and armed with what Mark Mondragon calls a "capacitor rifle", Ada has trained herself how to fire such a large weapon and braces herself against the recoil so that she slides back several feet with each shot. That's just plain old double-tough.


The Ada miniature comes on one sprue and contains both the capacitor rifle and a backpack. Casting was beautiful on this piece and assembly was very straightforward and simple. The addition of a separate crotch guard and should pads give the mini a nicely layered look. I added a few pieces from the accessory set to add a sidearm, PDA, and first aid kit to the mini. And a couple of crates made a quick bit of cover for Ada's base.


Besides being simple to construct Ada was very quick and easy to paint. There's enough detail on the armor pieces that light drybrushing really makes them pop. I didn't take the time to try for the digital camo pattern that DreamForge shows on the pouches of its digital models but someone with better eyes than me might have a go.


And finally one of my favorite things about the Ada miniature is that she looks like an actual female soldier and not a stripper with a rifle. Although I have nothing against the Heavy Metal, chainmail-bikini clad, battle-hooker look that so many miniature companies seem to go for it is very refreshing to see a miniature of a female that looks at least somewhat realistic when compared to its male counterparts. So there.


Thursday, February 14, 2013

DreamForge Unboxing Part 2: Stormtrooper Accessory Set

At one time mules, the actual animal, were important to squads of soldiers. They could carry a lot more equipment than a single human and allowed soldiers to be less encumbered while also keeping then well supplied in the field. Later various types of mechanical devices were called mules due to their ability to move and carry military cargo. Everything from small electric tractors used to move aircraft ordinance to multi-wheeled cargo vehicles have been dubbed mules. 

Now the development group BostonDynamics along with DARPA are developing the next stage of military mules, the BigDog.


Using this as a starting point DreamForge games has included a model of a slightly more advanced mechanical mule with their set of Stormtrooper Accessories. These detailed little kits are outstanding and offer a lot of poseability and options for conversion. The only nitpick I have with them is the fiddly nature of the legs. Parts this small are a pain to work with using my stumpy fingers and cleaning the mold lines from them will be a chore. However the multi-part nature allows them to be posed much more realistically so it's a fair trade off. Just be wary and work in sub-assemblies. And make sure the legs are totally dry before trying to glue them into the main body.


The accessory sprues also contain several cargo boxes that are perfect for the mules. And 10 panzerfausts. Just in case you need them.
With a Wargames Factory Greatcoat Trooper conversion 
This is the Smart Mule head. A contradiction in terms from what I've heard about mules.
The cargo "claws" are moveable so that they can be closed tightly around specific cargo. They can also be left off completely to make a med-evac stretcher, water tank, or mobile missile battery.

I added a set of Stormtrooper Accessories to my DreamForge Kickstarter order simply to get the cargo mules. At first I thought each set only contained one of these but was very happy to find that there are three. They are a bit smaller than I first thought but look great once assembled and scale well with 28mm scale figures. And the design will work well with any futuristic type of soldier and not just the DreamForge Eisenkern.

The rest of the accessories are really too numerous to catalogue here. A field computer, field PDAs, first aid kits, and dozens of pouches, packs, and bags along with guns, grenades, and knives...whew. And that's not to mention the specialized heads for officers, soft covers for troopers, various hands etc. There's so much bloody stuff on these two sprues that I don't know where to start. So I won't. But be assured if you want a lot of little greeblies to enhance your sci-fi soldiers there are plenty of options here. All of the castings are crisp, detailed, and well done.

Here are some examples:


Next blog: Ada and the weird dog alien thing.

Wednesday, February 13, 2013

Unboxing The DreamForge Games Leviathan Crusader.


One of the coolest moments as a hobbyist happens when I see a project that makes me think that I could have designed it. Not that I'm suggesting that I'm as skilled as the designer but more that it's an idea I've had myself and not created. Pretty much like somebody reaches into my head, grabs a mental image, and then makes it real. Recently this has happened twice, first during the eagle rescue scene in Peter Jackson's The Hobbit, and next when I opened DreamForge Games Leviathan Crusader kit. In both of these instances something connected with me and shouted: 
" Yes! That's it! That's how it should be done."


I supported the DreamForge Kickstarter campaign and chose to get a basic Crusader and the Eisenkern Trooper Accessory pack since I wanted the robotic "mule" that comes with it. I actually received quite a bit more due to stretch goal goodies so I got a couple of extra weapons for the Crusader as well as an Ada- Little Lady with a Big Gun and a Feral Shadowkesh and Handler. There was so much stuff to look through!

First up are the Leviathan upgrades: Capacitor Coolers, Excalibur Combat Sword, and Left Vulcan (this allows for both arms to mount Vulcans since the main kit already comes with the right). Nice packaging and clear images on the boxes to show how they are used with the main kit. I'm really looking forward to seeing how the "Fast Arm Swap" feature works. This will allow the arms to be removed for shipping and easily optional weapon arms. All of the parts are well cast in gray plastic and are clean and sharply detailed. Casting is equal to any plastic model kit that I've seen and the parts themselves are solid and strong.


Next up I'm tackling the main monster itself, The Leviathan Crusader. This massive beasty promises to stand 8.5" once assembled and certainly the amount of parts back up this claim. There is so much plastic in this thing!


Upon opening the kit you are suddenly confronted with THE BASE. This was a bit of a shock because although I've been using plastic miniature bases since their creation I've never encountered one that nearly the size of a 45rpm record. And since it's the first thing you see of the kit it certainly lets you know that this sucker is bloody big.

The Black Belles are pretty cool as well.
I pulled out some foam and there are two stacks of sprues that use that groovy sprue connection that Wargames Factory uses. The stacks are rubber banded together so they fit perfectly in the box. The problem however is trying to remember how to stack them the same way to get them back into the box. Oh well, I took pictures.

Oh my god, it's full of sprues....
Now to get it to all go back in.

It's pretty hard to get a sense of scale for this kit but one thing I was impressed by is how simple the parts of the Leviathan seem to be. There's a good amount of detail to them and they will look great once they're put together. But there aren't a lot of super-fiddly bits to make assembly tortuous and painful. The arms and legs use a screw system so that they remain posable once assembled. And they even include a screwdriver!

They added a screwdriver, isn't that nice? That Mondragon fellow must be a class act.
Instructions seem to be clear and well illustrated with colored images showing how sub-assemblies fit together. Assembly looks to be straight forward and well designed.

Next blog I'll go over the Eisenkern Trooper Accessory Pack and the other miniatures that were included.

Thursday, November 8, 2012

The Strange, Strange Story of Zombie Plague.


Zombie Plague has been a constant in my life for over twelve years. It has been a blast at times and a struggle during others. First created during my college years as a fun, fast board game of zombie goodness it was originally conceived as an old fashioned board game, the kind that your family kept in the top of the hall closet in a long, flat box. The closet that smelled odd because of the coats and boots stored there. It was meant to be a game that you could take down and play easily because everyone already knew the rules. While it has yet to reach this form it has become so much more.

I think the first time I started thinking about it was when Allen Thomas, co creator of Wargods of Aegyptus, was watching a game of Space Hulk at The Game Preserve. At that time I was prone to giving all night movie parties called Zombie Fests so I had zombies on the brain. Eww. Allen mentioned that this sort of game could be adapted to use zombies. And the bulbs started clicking on in my head.

I wrangled Skott Kilander into working with me on a simple rules set (that he pretty much created) and somehow Tom Sawyered the Rodman Brothers at Fortress Figures into sculpting and casting a line of miniatures for it. Ben and Jeff Rodman went to town coming up with character zombie concepts that are still funny, Matt the laying down zombie, Skip the legless zombie etc. Ben started pushing putty and soon there was a whole horde of the undead waiting to be taken out onto the board. I had one human character that I knew I wanted to use, Crissy Hot-Rod, and Jeff and Ben came up with a cheerleader with a chainsaw that we called Chelsea. Timmy came from a project I was working on in college about a kid who couldn't hit a baseball because he needed glasses. And John was the standard tough guy.
The cover to the original PDF.
Original Crissy mini sculpted by Ben Rodman and painted by Marike Reimer.
I talked some of my artist friends into doing illustrations and Skott drew a map based on his apartment. Kathy Earwood laid the whole thing out and we were in business. Or so we thought.

The biggest problem back then was that the internet that I needed to promote ZP was not fully formed enough yet. My idea was to create a free to download game that would get so popular that we would start making money on the sale of miniatures for it. Jeff put it online via the Fortress Figures site, I created a Cafe Press store and then it seemed to sink quietly into oblivion. I still had my game set and would drag it out occasionally to play at parties, explaining how someday I would have the money to really make a great version of it. But the money never came and the game sat stagnant.

Until Rob Robinson created a Yahoo Group for ZP. I somehow found or was invited to this group and realized that people still seemed to like this little punk rock game that we'd created. It was translated into several different languages. The "open license" copyright that we stuck on it allowed for creative gamers to come up with maps, cards, and new rules that in some cases put our initial version to shame. I am still amazed at how it was embraced and enjoyed by people all over the world. Rob has been very generous with his help with ZP ever since and I truly appreciate his support of the game, attention to detail, and keen ability to find rules issues.

Although I saw that there was interest in ZP I still didn't have the resources to make it into something more finished and whole. Since it's creation I had started telling myself a mental story about the kids that were featured in the game. Crissy was tough and resourceful, John was stoic yet protective of the others. Timmy was determined and Chelsea? Well when Chelsea picked up her chainsaw she was just plain crazy. I wanted to tell these kids' story but still didn't have the means to do so.
The evolution of Crissy. The name came from one of my lab managers at Lenscrafters and his need to give everyone a nickname. One of the other staff was zipping around the lab and thus became Little Chrissy Hot Rod. I kept the name in my memory and then based the character on my friend Maria. Tank Girl meets Warhammer 40K.
Original Zombie Plague comic concept by Jae Gordon.
Another version by Kurt Metz. Around 2008(?)

By Phibbz Abando. 


Then I started working with Ronda Pattison. Ronda is one of the most prolific comic book colorists in the industry and soon became my close friend and business partner. We decided to create a company to publish our own games and comics and when she asked me what ideas I had I told her about Zombie Plague. She saw ZP as being more whole and ready to work with than my other ideas so we kicked into gear to produce it.

By this time Kickstarter was becoming more useable so we decided to fund not only a comic about the four kids but also revamp the rules. Thus began one of the most stressful and rewarding years of my life as we first promoted ZP on Kickstarter and then worked to make it real. The artist Phibbz Abando came onboard and started cranking out pages to tell the story of ZP in a double sized comic that seemed to stretch in pages every time I re-wrote it. There were some speed bumps with the Kickstarter campaign but eventually these were rolled over and the project kept moving forward. Ronda's belief in me and the project was unshakeable and I'll never be able to repay her for her constant support.

Some of the promo stuff from the Kickstarter campaign:

My friend Annie makes for a very creepy-cute zombie.
Luckily the spirit of El Santo helped push the Kickstarter campaign along to victory!
El Santo has a rocket pack. I want a rocket pack.
Yes I was even willing to threaten my puppet self for a little ballyhoo.
The story that I've tried to tell with Zombie Plague is pretty simple. What happens when the world goes crazy and you have to rely on yourself and your friends to get out if it? I've wanted to do a zombie comic ever since reading Dead World back in 1987. The few issues that I managed to find back then changed my perception of comics as a medium both in art and in story telling. Main characters died man! That stuff just wasn't really common in my minimal experience. But Dead World was Dead World and I didn't feel the need to reinvent the wheel. Instead I worked with my friend Sean Bellinger on a weird horror comic called Tripe and drew my own classic comic, Nuke-O The Wonder Mutant in Quest for Beer. Both of these only published via our Publication department's photo-copier.

Dead World by Kerr and Locke.
Overall I've grown pretty tired of the most common zombie story. Zombies show up, eat some people, and everybody becomes a jerk to each other. I wanted characters who cared about each other and who would put themselves at risk to save their friends. Deciding on this point made writing the story very easy, these kids would stick together and not devolve into a soap opera squabble-fest.
From Zombie Plague: The Day From Hell
Somehow enough people reached into their hearts and Paypal accounts so that the Kickstarter campaign was successful. These folks are my heroes. And I finally got to write my zombie story. The comic came together with the help of Phibbz Abando and Ryan Howe. My adopted brother Matt Zimmerman helped with the map and everything else. You can pick up an issue here.

I reworked the rules with Rob Robinson's help and included those in the comic. I still wanted to keep some of the feel of the original ZP so I made all of the map pieces, game, cards etc available on our website for free download.

Now we are running another Kickstarter to create new miniatures for Zombie Plague. I'm able to work with one of my favorite miniature sculptors, John Winter, and I've been amazed by the response to the campaign so far. I can't wait to see what John comes up with for the other three characters, they're going to be something special.

New Crissy mini sculpted by John Winter.


Painted by Tracey Taylor.
So that's where ZP currently stands. Or shambles. Or whatever. There's still more stories to tell about the four kids from Appleton High and I'd love to see the miniature line continue to expand. And maybe someday there will be a long flat box in the top of the hall closet just waiting to be taken down and played. Hopefully it'll be fun and easy because everybody already knows the rules.