Showing posts with label Miniature Painting. Show all posts

Sunday, August 27, 2017

Converting and Painting a Rogue Trader Mutant.


I had just enough time this week to sneak in an entry to the Beware Mutants Competition on
The Emporium of Rogue Dreams.  The entries were generated using the random mutant rules in the original Warhammer 40,000: Rogue Trader rulebook and unpainted and painted versions were required. 

I chose a human as a base model, no way I'm chopping up my rare RT squats, and rolled for three mutations. I got Skull face, Moronic, and Very warty skin. Nothing that would really help the character in a fight and Moronic means that he must make a test every time that he tries to use any sort of technology. And that he's completely unable to open milk cartons or yogurt containers.


The body is a Major Magnam mini from Rogue Trooper with a skull head from a Screaming Skull Catapult crew man. I sculpted a thick covering of warts on his arms and neck and added a plastic lasgun. Of course at this point he's missed his Moronic test and is waving it like a wand hoping that hot light comes out of it.

I also Photoshopped a Chapter Approved: Book of the Astronomicon style stat sheet for Ol' Knobby and created a blank version so others could use it. The main font seems to be Sudbury Book which is easy to find for free online. The main header is Arial Black.


Although the rolls made for a pretty pathetic mutant, I had a fun time converting and painting this little fella and coming up with his back story. Plus I used all Rogue Trader era bits which makes me extra happy. :)

Tuesday, December 20, 2016

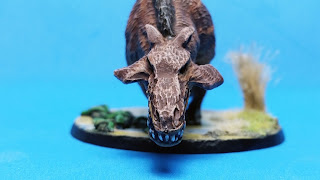
Forge of Ice Entelodont "Skull Pig"

Sculpted by Matt Gubser.
"What big teeth you have..."
"Gznort!"
Alex Bates at Forge of Ice is brilliant at coming up with bizarre minis that I don't know I need until I see them. This entelodont, sometimes falsely called a "hell-pig" or "terminator-pig", is just such a miniature. Alex had asked me to design a few bases for him so I used my laser cutter to create a tile pattern and then sculpted vines to show an ancient civilization being overtaken by jungle.


As part of my compensation for the bases Alex sent me two of the entelodonts so I quickly assembled and painted one. Assembly is a breeze, pin the head on and add a bit of green stuff to soften the join. Then just drybrushing and washing to capture the fur texture. I based the color scheme on this excellent rendering by Masato Hattori.


The base was painted and then had static grass and jute twine added.

Overall this is a solid mini that reads perfectly as the overpowered beast it's meant to represent. Matt truly captured the musculature and forward motion of such a beast. It was a blast to paint.

Thursday, May 19, 2016

Painting A Reaper Bones Shoggoth


A very simple paint-job to become more used to the Reaper Bones material. Using a dedicated brush-on primer like Citadel Undercoat really worked better than standard black paint. Damp-brushing, dry-brushing, and washes make this a quick and effective project.

The miniature can be found here:https://www.reapermini.com/Miniatures...

Thursday, April 28, 2016

Painting a Trash Bash Building Video

Four months later and I finally managed to paint the observation tower/power plant.

Sunday, March 27, 2016

Painting RBJ's S.T.A.R. Trooper Minis

A small unit of Slammers hold off local militia while waiting for combat car support.
My buddies at Fortress Figures have started a new miniatures company called RBJ and their first release are these groovy S.T.A.R. Trooper minis. Designed by Ben Rodman and digitally sculpted by Bobby Jackson these sci-fi soldiers are super clean, well proportioned, and have the perfect amount of detail to make painting them quick and fun.

Solid, classic poses that are easy to recognize on the battlefield.
RBJ gave me a preview set of eight minis that included a commander, heavy-weapon trooper, four riflemen, two kneeling, and two troopers throwing grenades. The grenades and weapons are nicely scaled to the troopers, they are large enough to show up on the mini but not so ridiculous that they appear impossible. Even the massive rotary cannon looks great once you actually hold the mini in your hand. 

The proportions of the arms and armor have been carefully considered to look right once cast in metal or resin, something that many digital sculptors still seem to have difficulty with. I think this comes from Ben and his brother Jeff having so many years of sculpting and casting experience and from Bobby Jackson's history as first a putty sculptor and then a digital sculptor. Together these guys know what works on the final mini and what doesn't. On the STAR Troopers it all works.

First thing I did was a quick filing to clean up the very minimal mold lines. VERY minimal. Overall these minis are super clean and easy to prep.

The minis fit into the bases solidly and without any extra work.
Next up they were glued to the included plastic bases. the was a small gap that was filled with green stuff and the whole base was painted with wood glue and dipped in fine sand. I always add sand to my mini bases before I prime them so the the primer adds another level of adhesion to the sand.

Although I usually black prime my minis I decided to go with a white primer. I wanted to use a similar uniform color scheme to David Drake's Hammer's Slammers Mercenaries so they would be primarily light tan colored with black details. The Troopers minis that RBJ has shown have been in strong primary colors but they look great in more "realistic" military colors as well.

The base layer of color is GW Zandri Dust applied in two thin coats. Keeping the paint thin and allowing it to smooth itself as it dries really helps to keep the smooth surfaces and sharp edges of the armor plates.


Next up I used a wash of Nuln Oil and Calthan Brown to define the areas between the plates. I wasn't careful at all with this but made sure to get it all over the armor. I also find that blowing on the wet mini pops any small bubbles the form and allows the overall wash to dry more smoothly.


Once the wash was completely dry, I did some very light dry-brushing with Vallejo Model Colors Dark Sand and White. I did about three dry-brush layers adding a bit of white each time. I did a little edge highlighting but not much. I wanted to see how good I could make these look with minimal effort. :)


To finish up I painted the weapons, grenades, pouches, and helmet faceplates with black. I dry-brushed everything except for the faceplates with a very dark gray to bring out the detail. I use very little metal on sci-fi guns since it seems like they'll all have primarily plastic parts in the future anyway. I still paint the barrels silver to add a little visual interest.


Finally I added some small numerical decals to four of the minis and coated the faceplates with GW 'Ardcoat to make them shiny. Painted the bases and added some static grass.

Overall these new STAR Troopers are well sculpted, well proportioned, and a blast to paint. They clean up and assemble in a snap and stand on the bases perfectly so you don't need to prop them up as the glue dries. These are well detailed minis that are also made for painting and gaming. You really need to see them for yourself.


Check out the RBJ Kickstarter here:
https://www.kickstarter.com/projects/1620164718/star-trooper-miniatures?ref=nav_search

Tuesday, March 17, 2015

Painting a Rogue Trader Era Dreadnought.


The original Imperial Dreadnought, sculpted by Bob Naismith, for Games Workshop's Warhammer 40,000: Rogue Trader has always been one of my favorite miniatures, possibly because they were being rolled out right at the time that I was first getting into 40K or possibly because they're just so freaking cool.

Schematics by the enigmatic "H". Check out my interview with him here.

If only those prices were still valid.
Painted by Paul Benson. These images were hugely influential in forging my love for these minis.
Also by Paul Benson.

While reading the dreadnought rules in White Dwarf #100 I came across the following tid-bit about "DREADNOUGHT LEGIONS"!!! Entire armies made up of Naismith's kitty-cat inspired dreads?! Oh yeah, I'm totally into that.


Thanks to Marc Solursh on the Oldhammer Facebook group I aquired a couple of dreads and committed to building a legion. Or at least a unit of five. 

The color scheme was discussed on the Facebook forum and I decided on the Golden Knights with both the colors and name coming from my high school, Arlington. I have an idea for a legion icon based on a medieval tilting helmet but haven't really finalized it.


While I was prepping the miniature I made a couple of bases for the future legionnaires. It has come to my attention that these original 40mm plastic bases are sort of hard to come by so if anyone knows of a good source please let me know. Plastic diamond-plate, old plastic weapons, and hand twisted barbed wire cover a base of Milliput on these bases.


I made a small hill for on one of the bases so I could reposition on of the dread's legs to make it a bit more dynamic and "stompy".

Next up I attached the mini to a specially created "dreadnought cork", using a wooden disc screwed to the top of a cork to give a wider platform to attach the dread to. Luckily this survived pretty well so I'll be able to use it with the other dreads.


Since I wanted this fellow to be a Contemptor Class I needed to re-create two bolters since the arms I had only had one each. I used Instant Mold Putty and Procreate and am overall pretty happy with how they turned out. You can see how I use Instant Mold here.

Next up was painting and attaching to the base.

STOMP!
Showing the power plant. I like to paint tech-bits like these in various metallic colors to make them look like more than a single hunk of metal.
Showing the vintage Aquila decal that fell apart as I was soaking it. These early decals were never perfect and years of moisture and time have degraded some of the oldest decals.
"Hi there!"
One down, four more to go!

Friday, October 17, 2014

Converting and Painting a Miniature for Numenera.

I've recently started playing in a Numenera game with a great group of players. Numenera is a sort of dark age of technology setting that takes place a billion years into the future and uses evolved technologies in ways that mimic magic. It's a beautiful setting that is written well and uses a system that allows for a lot of player interaction while keeping the game moving. 

I'm enjoying it so much that I decided to convert and model a mini of my character Chert Blazebeard. Chert is a re-imagined version of an earlier D&D character of mine who is sort of a traveling warrior/weapons-smith. He began life as a farmboy, became a smith's apprentice and now travels the lands of The Ninth World seeking martial challenges that will help him in his quest for better weapons and fighting techniques as he studies The Way of The Striking Anvil.


Sketch of Chert Blazebeard.

I was going through some Reaper Bones minis at my FLGS and found a great starting mini sculpted by Bobby Jackson. The mini is of a flame-thrower trooper called Torch McHugh 80018 and had a bulkiness and weight that I liked. I'd already started drawing Chert as wearing quilted armor and finding this mini seemed fortuitous.

There was a lot of cutting on this mini that I would not have tried with any material other than the hardened vinyl of Bones. The stuff is brilliant for massive conversions. There are still some issues with detail softening but not enough to worry about. This was going to be a gaming mini and not a contest entry.

The following pictures show the basic steps and tell which greeblies I used. Enjoy!


So much disassembly made so easy.
Even the massive fuel tanks were clipped off easily.

With the head re-angled the whole pose changes.

Arm from Games Workshop.

Pads from Gangs of Mega-City One and shield from The Homer car model kit.

Backpack from Warzone Bauhaus Trooper.

Green stuff for armor, beard, and axe blade.

Very basic paintjob. Simple colors with Citadel Washes and light drybrushing.


Base from Champ Industries.

Chert Blazebeard, ready to rumble!

Tuesday, October 7, 2014

Bogey Commander Robble from World Wasters.


Just finished Commander Robble of Robble's Rocket Raiders. Robble ( a corruption of Rommel and that noise that Hamburgler makes) is a rare example of Bogey military leadership in that he actually likes fighting and is unafraid to get into a skirmish alongside his men. He uses his trusty sidearm pistol and custom FistFaust to both attack his foe and keep his men in line! 

This mini is part of the World Wasters line designed and sculpted by Steve Lortz and soon to be re-released by Fortress Figures.

See more Bogeys here:
http://roebeast.blogspot.com/2014/10/world-wasters-bogeys.html


Sunday, October 5, 2014

World Wasters Bogeys.

Buggle on the revamped cover of World Wasters.
Robble's Rocket Raiders in the midst of some bad behavior.
From the war-torn pages of World Wasters come the Bogeys:


"Bogeys are native to the New Arm. In the parts that have been, explored so far, they are the numerically dominant species. Legend has it that a long lost species known as the Ancient Masters designed the bogeys to serve as fighters and laborers.

A degenerate species, bogeys are rude, stupid, vicious brutes, loosely organized by clans and tribes that incessantly fight with each other. The most forceful or cunning bogeys rule the others. Though technology on bogey worlds is crude, often no more advanced than medieval, these creatures are capable of learning to use most state of the art equipment. When they get hold of something like a starship, bogeys use it up, vandalizing and pushing it far past any reasonable limit with no regard for maintenance or safety.

A bogey tactical squad usually includes one second level leader, one first level heavy weapons specialist and eight other first level bogeys."~ From the World Wasters Playtest Edition by Steve Lortz.

My first squad of Bogey's are Robble's Rocket Raiders. Both Bommer and Biggles share the same body as do Breever and Buggle. These minis were sculpted by Steve Lortz in the early 1990s and are being re-released by Fortress Figures with new poses and are tabbed to work with slotted bases. We're hoping to re-release the WW rules this year as well.

Biggles.
Blaster.
Bommer.
Breever.
Buggle.